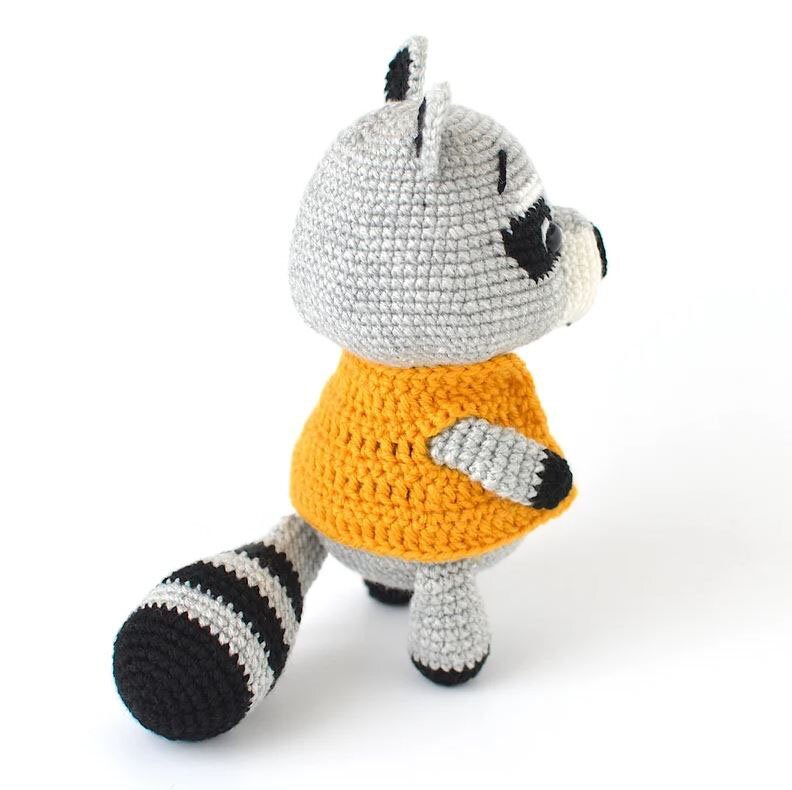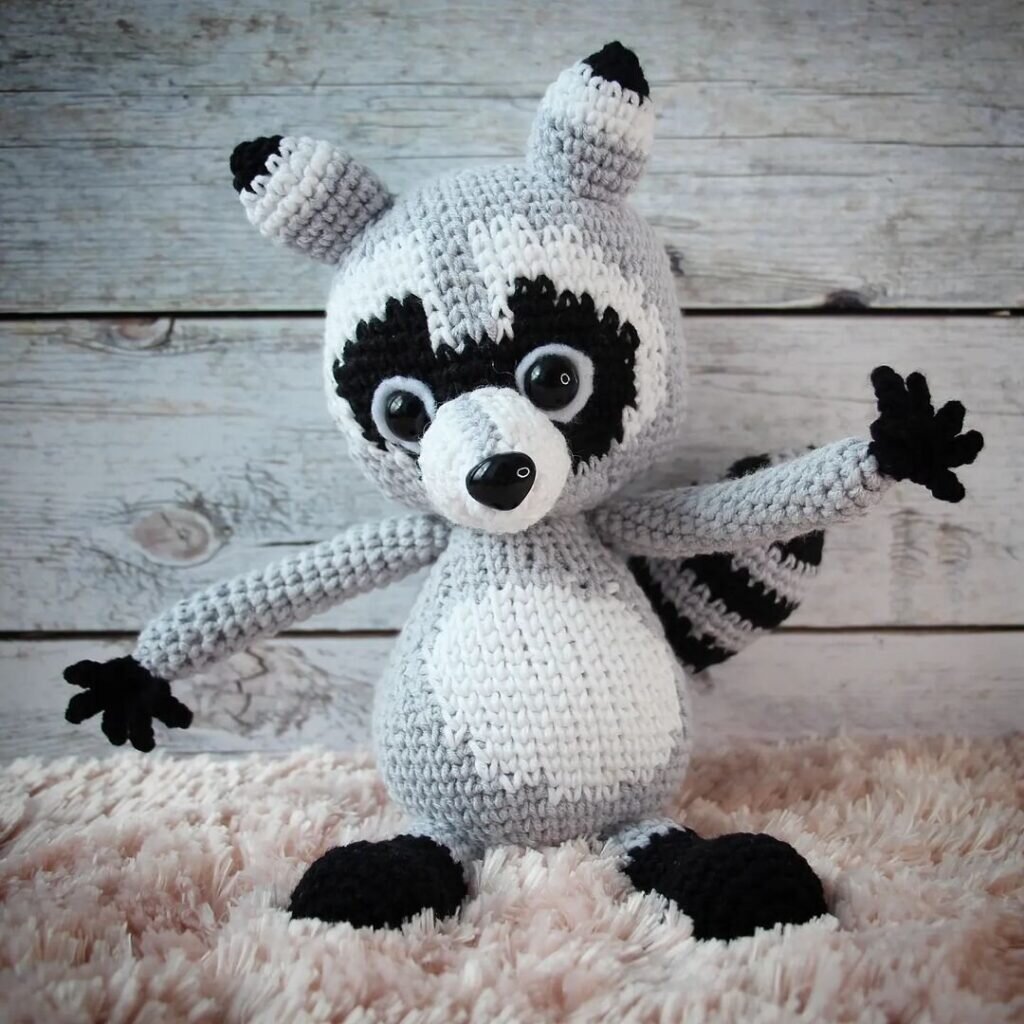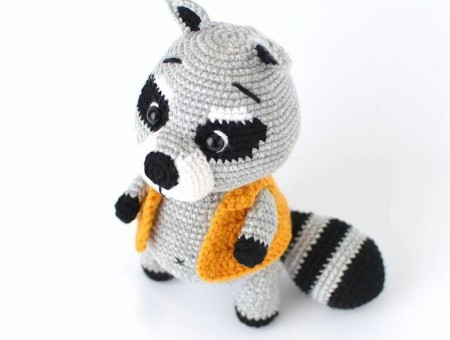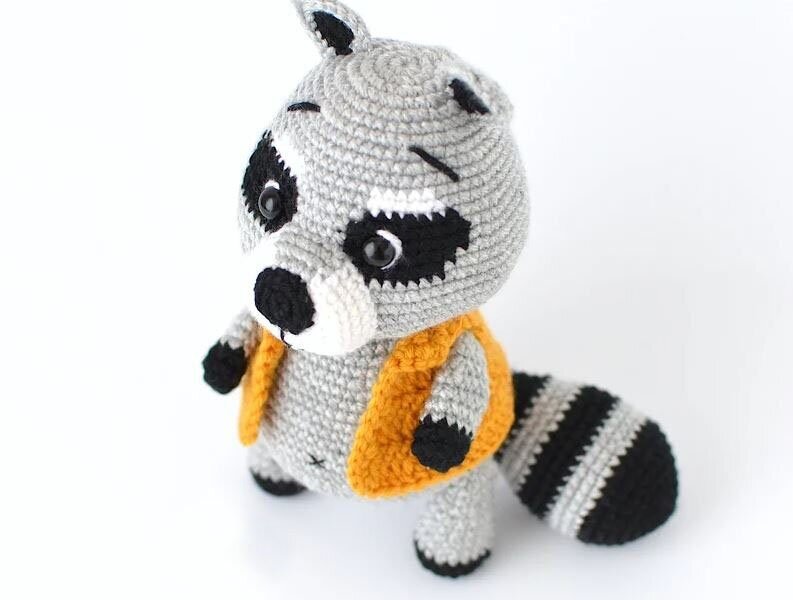
Raccoon Amigurumi Free Pattern
Hello dear Amigurumi enthusiasts! Today I would like to share with you a free Amigurumi Animal pattern and construction instructions. Amigurumi has become a popular hobby in the world of craftsmanship, and in this article I will present you a great Amigurumi Animal design. Trust your imagination while doing amigurumi. And dare to create your own unique designs. Welcome to the Amigurumi world, enjoy fun handicraft projects.
Here’s the FREE pattern!
YARN: Light (3) Gray, White, Black, Yellow; Classic Cotton Thread in Black
MATERIALS: 2.75 mm Hook; 3.25 mm Hook; Poly Filling; Two 10 mm Black Plastic Safety Eyes
DIMENSION: H. 7.5” x L. 6” x W. 3.5”
ABBREVIATIONS: magic ring (mr), stitch (st), slip stitch (sl st), single crochet (sc),
double crochet (dc), back loop only (BLO), front loop only (FLO), fasten off (F/O)
SKILL LEVEL: Beginner
INSTRUCTIONS: work in rounds (join with a sl st and ch 1 at the end of each round) unless otherwise instructed.
HEAD (gray, white and black yarn; 2.75 mm hook)
Rnd 1: starting off with gray yarn, 8 sc in a mr (8)
Rnd 2: sc inc around (16)
Rnd 3: (1 sc, 1 sc inc) rep around (24)
Rnd 4: (2 sc, 1 sc inc) rep around (32)
Rnd 5: (3 sc, 1 sc inc) rep around (40)
Rnd 6: sc even (40)
Rnd 7: (4 sc, 1 sc inc) rep around (48)
Rnd 8: sc even (48)
Rnd 9: (5 sc, 1 sc inc) rep around (56)
Rnd 10: sc even (56)
Rnd 11: 20 sc, switch to white yarn, 5 sc, switch back to gray yarn, 6 sc, switch to white yarn, 5 sc, switch back to gray yarn, 20 sc (56)
Rnd 12: 19 sc, switch to white yarn, 6 sc, switch back to gray yarn, 6 sc, switch to white yarn, 6 sc, switch back to gray yarn, 19 sc (56)
Rnd 13: (6 sc, 1 sc inc) rep twice, 4 sc, switch to black yarn, 2 sc, 1 sc inc, 4 sc, switch back to gray yarn, 2 sc, 1 sc inc, 3 sc, switch to black yarn, 3 sc, 1 sc inc, 3 sc, switch back to gray yarn, 3 sc, 1 sc inc, (6 sc, 1 sc inc) rep twice (64)
Rnd 14: keep working with gray yarn, 19 sc, switch to black yarn, 10 sc, switch back to gray yarn, 5 sc, switch to black yarn, 10 sc, switch back to gray yarn, 20 sc (64)
Rnd 15: repeat rnd # 14 (64)
Rnd 16: (7 sc, 1 sc inc) rep twice, 4 sc, switch to black yarn, 3 sc, 1 sc inc, 5 sc, switch back to gray yarn, 2 sc, 1 sc inc, 2 sc, switch to black yarn, 5 sc, 1 sc inc, 3 sc, switch back to gray yarn, 4 sc, 1 sc inc, (7 sc, 1 sc inc) rep twice (72)
Rnd 17: keep working with gray yarn, 23 sc, switch to black yarn, 9 sc, switch back to gray yarn, 6 sc, switch to black yarn, 9 sc, switch back to gray yarn, 25 sc (72)
Place the eyes between rnds # 15-16, 9 sts apart
Rnd 18: sc even (72)
Rnd 19: (8 sc, 1 sc inc) rep around (80)
Rnd 20 – 22: sc even (80)
Rnd 23: (8 sc, 1 sc dec) rep around (72)
Rnd 24: (6 sc, 1 sc dec) rep around (63)
Rnd 25: (5 sc, 1 sc dec) rep around (54)
Rnd 26: (4 sc, 1 sc dec) rep around (45)
Rnd 27: (3 sc, 1 sc dec) rep around (36)
Rnd 28: (4 sc, 1 sc dec) rep around (30)
Rnd 29: (3 sc, 1 sc dec) rep around (24)
Rnd 30: working in FLO, sc even (24)
Rnd 31: working in both loops now, (3 sc, 1 sc inc) rep around (30); start stuffing
Rnd 32: (4 sc, 1 sc inc) rep around (36)
Rnd 33: sc even (36)
Rnd 34: (5 sc, 1 sc inc) rep around (42)
Rnd 35: sc even (42)
Rnd 36: (6 sc, 1 sc inc) rep around (48)
Rnd 37: sc even (48)
Rnd 38: (5 sc, 1 sc inc) rep around (56)
Rnd 39 – 40: sc even (56)
Rnd 41: (6 sc, 1 sc inc) rep around (64)
Rnd 42- 46: sc even (64)
Rnd 47: (6 sc, 1 sc dec) rep around (56)
Rnd 48: (5 sc, 1 sc dec) rep around (48)
Rnd 49: sc even (48)
Rnd 50: (4 sc, 1 sc dec) rep around (40)
Rnd 51: (3 sc, 1 sc dec) rep around (32)
Rnd 52: (2 sc, 1 sc dec) rep around (24)
Rnd 53: (2 sc, 1 sc dec) rep around (18); finish stuffing
Rnd 54: (1 sc, 1 sc dec) rep around (12)
Rnd 55: sc dec around (6)
F/O, cut the yarn and wave in end.
Embroider the eyebrows with black cotton yarn, between rnds # 7-11.
Embroider the contour around the eyes with white yarn.
MUZZLE (white and gray yarn; 2.75 mm hook)
Rnd 1: starting off with white yarn, 8 sc in a mr (8)
Rnd 2: sc inc around (16)
Rnd 3: (1 sc, 1 sc inc) rep around (24)
Rnd 4: (2 sc, 1 sc inc) rep around (32)
Rnd 5: working in BLO, 14 sc, switch to gray yarn, 4 sc, switch back to white yarn, 14 sc (32)
Rnd 6: working in both loops now, 13 sc with white yarn, switch to gray yarn, 6 sc, switch back to white yarn, 13 sc (32)
Rnd 7: repeat rnd # 6 (32)
F/O and leave a long strand of yarn to sew the muzzle to the head, between rnds # 15-26; stuff the muzzle before attaching it to the body.
NOSE (black yarn; 2.75 mm hook)
Rnd 1: 6 sc in a mr (6)
Rnd 2: sc inc around (12)
F/O and leave a long strand of yarn to sew the nose onto the muzzle.
Embroider the mouth, with black cotton thread.
EARS (black and gray yarn; make 2; 2.75 mm hook)
Rnd 1: starting off with black yarn, 6 sc in a mr (6)
Rnd 2: sc inc around (12)
Rnd 3: switch to gray yarn, 4 sc, 1 sc inc, 1 hdc inc, 1 ch, 1 hdc inc into the next st, 1 sc inc, 4 sc, do not join to the 1st st of the rnd (15)
F/O and leave a long strand of yarn to sew the ear on the top of the head between rnds # 3-8.
ARMS (black and gray yarn; make 2; 2.75 mm hook)
Rnd 1: starting off with black yarn, 8 sc in a mr (8)
Rnd 2: (3 sc, 1 sc inc) rep twice (10)
Rnd 3: sc even (10)
Rnd 4: switch to gray yarn, sc even (10)
Rnd 5 – 7: sc even (10)
Rnd 8: (3 sc, 1 sc dec) rep twice (8)
Rnd 9 – 10: sc even (8)
F/O and leave a long strand of yarn. Stuff the arms lightly.
LEGS (black and gray yarn; make 2; 2.75 mm)
Rnd 1: starting off with black yarn, 6 sc in a mr (6)
Rnd 2: sc inc around (12)
Rnd 3: (1 sc, 1 sc inc) rep around (18)
Rnd 4: sc even (18)
Rnd 5: switch to gray yarn, sc even (18)
Rnd 6: sc even (18)
Rnd 7: (4 sc, 1 sc dec) rep around (15)
Rnd 8 – 9: sc even (15)
Rnd 10: (1 sc, 1 sc dec) rep around (10)
Rnd 11 – 12: sc even (10)
F/O and leave a long strand of yarn. Stuff the legs firmly.
TAIL (black and gray yarn; 2.75 mm hook)
Rnd 1: starting off with black yarn, 6 sc in a mr (6)
Rnd 2: sc inc around (12)
Rnd 3: (1 sc, 1 sc inc) rep around (18)
Rnd 4: (2 sc, 1 sc inc) rep around (24)
Rnd 5: (3 sc, 1 sc inc) rep around (30)
Rnd 6: sc even (30)
Rnd 7: (4 sc, 1 sc inc) rep around (36)
Rnd 8: sc even (36)
Rnd 9: switching to gray yarn, sc even (36)
Rnd 10 – 11: sc even (36)
Rnd 12: switch to black yarn, sc even (36)
Rnd 13: sc even (36)
Rnd 14: (4 sc, 1 sc dec) rep around (30)
Rnd 15: switch to gray yarn, (3 sc, 1 sc dec) rep around (24)
Rnd 16: sc even (24)
Rnd 17: (2 sc, 1 sc dec) rep around (18)
Rnd 18: switch to black yarn, sc even (18)
Rnd 19: sc even (18)
Rnd 20: (1 sc, 1 sc dec) rep around (12)
Rnd 21: switch to gray yarn, sc even (12)
Rnd 22: sc even (12)
Rnd 23: (4 sc, 1 sc dec) rep twice (10)
Rnd 24 – 26: sc even (10)
F/O and leave a long strand of yarn. Stuff the tail firmly.
JACKET (yellow yarn; 3.25 mm hook; work in rows)
Rnd 1: 25 chs, 1 sc in the 2nd ch from the hook, 23 sc (24); ch 2 and turn
Rnd 2: (2 dc, 1 dc inc) rep around (32); ch 1 and turn
Rnd 3: sc even (32); ch 2 and turn
Rnd 4: 4 dc, 4 chs, skip 4 sts and work 1 dc into the next st, 15 dc, 4 chs, skip 4 sts and work, 1 dc into the next st, 3 dc (32); ch 1 and turn
Rnd 5: (3 sc, 1 sc inc) rep around (40); ch 2 and turn
Rnd 6: dc even (40); ch 1 and turn
Rnd 7: (4 sc, 1 sc inc) rep around (48); ch 2 and turn
Rnd 8: dc even (48)
Do not cut the yarn, sc around instead (make 3 sc on each corner). F/O, cut and hide the yarn.
Assembling Instructions:
- Place and secure the jacket onto the body with pins, so that you locate the spots where to attach the arm to. Mark the spots with few pins.
- Sew the arms to the side of the body. For your reference, I attached the arms between rnds # 32-38.
- Sew the legs to the bottom of the body between rnds # 46-50.
- Sew the tail to the back of the body between rnds # 45-50.
- Create the belly button embroidering an X with black cotton thread on the body.
It's All Finished: